BF Xenon's blog is a daily (hopefully) recap of our day as a company and a part of the community. Hopefully you will be able to watch us grow as a company as well as get a little insight into our community. You can expect: New Product Updates Community News Individuals / Customer Comments and much more...
Thursday, December 15, 2011
2011 BFxenon Christmas Special
Happy Holidays from BFxenon! In honor of another year of growth, we would like to offer all our supporters a 25% coupon code good for any BFxenon HID light order!
This year we aim to do more kits than ever before and we are making deals left and right! Lights, Wheels, Tires, Accessories, etc. If you have any questions, or would like to inquire about any product we sell, please email Sales@BFxenon.com!
The 25% BFxenon Coupon Code is: 25OFFBFX
and HURRY, this sale is ending soon!
Wednesday, October 5, 2011
How-To: Fiat 500 USA HID Installation
Fiat 500 Accessories: Installing the BFxenon HID Kit
The headlights that come with the Fiat 500 are modern BiHalogen projector beam headlights. Using the latest halogen bulb technology, they put out a sufficient light beam, however, for those who want the ultimate in visibility, High Intensity Discharge(HID) or Xenon headlamp bulbs are the way to go.
Up until a few years ago, Xenon headlights were only available on high end, exclusive automobiles, but are now slowly making their way towards more mainstream cars. One way this is happening is through aftermarket kits. These vary greatly in quality and run the gambit from Xenon bulb rejects found on eBay to kits made specifically for an individual vehicle.
In the aftermarket and Car Tuner world, BFxenon is known for their high quality Xenon kits and excellent customer service. BFxenon supplied their latest kit available for the Fiat 500 for me to try.
Upon opening the kit, I was impressed with the quality of the components, The connectors were well made OE grade connectors and fit together quite well. Mounting brackets and zip ties were included. Everything had a quality feel. Directions provided were generic, and not up to the high standards of the rest of the kit, but it is a relatively easy install and I'll provide some hints not covered.*
Connecting everything together is easy, Connectors are high quality and snap together. Here is a hint: Connector 4a on the ballast is marked + and - , make sure when you connect 4, the red wire is on the + side.
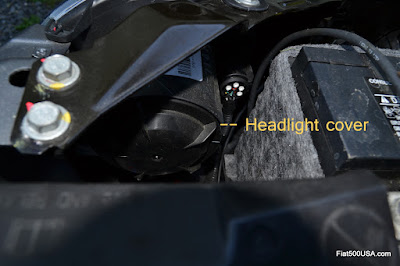
This is the back of the headlight on the drivers side. Grab this cover and give it a twist about a quarter turn. The cover will come off.
The only modification that needs to be done is to drill a 1 inch hole through the back headlight cover to pass the bulb wires through. I felt guilty about always borrowing my father-in-law's hole saws so I broke down and bought one. It measures one inch and can be bought at any hardware store.
The hole is drilled out and I filed the plastic edges 'cause I'm obsessive about stuff like that.
The new Xenon headlight bulb's wiring passes through the hole and...
the built in grommet keeps it sealed. Here is a hint: Hold off sliding the wires through this cover until you have installed the bulb into the light housing. This will give you a lot more room to work with.
Where you mount the ballasts are up to you. There are two criteria: The length of wire, and you shouldn't put the ballast where it will get excessively hot. For the ballast on the drivers side side, I bent up the supplied bracket and secured it with the supplied screws. The bracket bends up quite easily by hand so no problems.
There is a location on the radiator shielding that has a hole already drilled. It is perfect and right next to this sensor. I grabbed a bolt, washer and self locking nut and fastened the driver's side ballast. Even during 100 degree weather, this location proved noticeably cooler than other components under the hood.
Remove the old bulb by first disconnecting the grey headlight bulb connector. Then twist the bulb about a quarter turn or so and pull out. Sometimes it makes it easier if you push the bulb into the housing while turning it.
Install the new Xenon bulb the same way. The trick with installing any headlight bulb is the bulb is keyed and only goes in one way. Evenly insert the new bulb into the headlight, line up the cutouts in the base of the bulb and twist it. If you have difficulty, make sure it is pushed in all the way while twisting it. This is the only potentially fiddly part of the job. Treat the bulb gently and don't touch it or bang it around. If you touch it, carefully clean it with alcohol and a lint free cloth. Once the bulb is installed, connect the grey headlight connector to connector 1 on the Xenon bulb. This is important: You may have to reverse the connector if the lights don't come on, so remember this.
This is what the backside of the headlight looks when done. I used the supplied zip ties to tidy things up after I took these pictures.
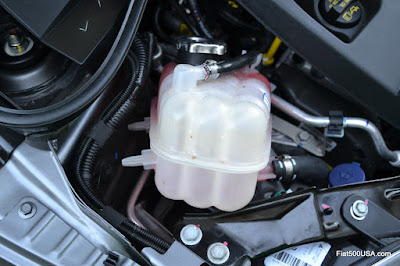
Do the same on the passenger side. There is a little less room here to mount the ballast. The best place I found is under the expansion tank. You just need to move the tank to get underneath it. Remove the one bolt and wiggle it out of its mounts. Lift it up and out of the way.
Mounting the ballast under the expansion tank is easy. Test fit it to get your spacing right. I used 3M double sided moulding tape which you can find at any auto parts store. Put a couple of strips of tape on the ballast and push it down. The tape is fine and will hold it securely. Like the ballast on the driver's side, this location kept the ballast cool relative to other components under the hood.
The BFxenon has a variety of bulb colors available. I chose the 6000K color which most closely matches an OE HID setup. The lights have the usual Xenon bright white beam which helps on the mountain roads that I drive on. The headlights provide excellent visibility and improved the high beam performance. The high beam lighting is one area I've always felt the 500 could use some help in.
Summed up, the installation went together well, with everything snapping together and other than reversingconnector 1 there were no surprises. BFxenon was quick to answer any questions and provides a 10-Day Satisfaction full money back guarantee and 6-Month Replacement Warranty.
*Disclaimer - The descriptions provided here are what worked on my car and I make no guarantee they will work on yours. Use at your own risk and I am not responsible if you damage your car. If you have doubts about your ability to do this kind of work, seek professional advice. Consult the appropriate authorities for the legality of installing aftermarket headlights.
source:
http://www.fiat500usa.com/2011/09/fiat-500-accessories-installing-bfxenon.html
Tuesday, May 24, 2011
BFxenon offers HID Xenon Lights for the New Fiat 500 USA
Not satisfied with your stock FIAT 500 Lights? BFxenon.com has developed an HID Xenon Light kit with performance, durability and ease of installation in mind. This kit has been specifically designed as an upgrade to your existing Fiat 500 Low Beam and High Beam lights.
BFxenon’s NEW Fiat 500 USA HID lights assist the driver tremendously in providing an expanded view of what is ahead. Essentially these Xenon Lights enhance your overall view by providing you to see an extended and lengthened stretch of the road. BFxenon HID lights play a crucial role in the overall safety of the driver by enabling you to identify dangerous obstacles effortlessly and more rapidly. The HID life expectancy is up to 10 times longer than the factory halogen bulbs and shines 3x brighter.
Side note: most customers have a common misconception that the higher the K (Kelvin temperature) the brighter it gets, but in fact, it is the opposite. The K rating is directly related to the color of the light discharged by the HID bulb. The more color saturation in the light, the less projection you will achieve. It is proven that BFxenon’s brightest HID temperatures are 6000K (pure white) and 8000K (mostly white with a light hue of blue). Also Xenon H.I.D. runs cooler than your traditional halogen, therefore it will not melt your housing. For more General HID Information, please click here
All aftermarket HID kits this kit is sold for off road and show use only. HID conversion kits may not be legal for road use in some areas. Please check your local laws prior to ordering.
This HID Kit is covered under a lifetime replacement warranty. All parts of the HID kit including the bulbs are covered under warranty!*
*The manufacturer will replace the product at no charge if it fails to work as designed. The lifetime warranty does not cover abuse or misuse of the product. The manufacturer reserves the right to replace the product with a similar product if the exact product is no longer manufactured. The owner is responsible for all shipping costs associated with the warranty exchange. The product is warrantied to the buyer and is non-transferable. Please keep the original proof of purchase receipt for all warranty claims. Customer is responsible for shipping defective product back to BFxenon.
Wednesday, May 4, 2011
Just launched the new Fiat HID template website
We have decided to start making template sites that feed our BFxenon.com page. Here is the first of this project:
Wednesday, March 2, 2011
NEW Lower Prices from BFxenon.com
Tuesday, March 1, 2011
BFxenon installs the first HID kit... Fiat 500 USA
Once again BFxenon has done it! We have just installed the first HID conversion for the new 2011 Fiat 500! We got the great opportunity to visit OC Motorsports (BFxenon Distributor) in Costa Mesa, CA and install our lights in this new Fiat.
The install was very easy and only took about 45 minutes. the hardest part to the install was finding a place to mount the ballast with so little engine compartment room. This also inspired us to engineer a new ballast bracket to help the install process go more smoothly.
Here are some before and after pictures from the install:
Before
After:
Compare:
Friday, February 11, 2011
5 things you need to know about HID lights
High Intensity Discharge (HID) lighting is the technology where light is created from electrical current passing through metal vapor. In HID bulbs, a tube of glass is filled with gas and has two electrodes on either side. When an arc of electrical current is established between the electrodes, the metallic vapor releases energy in the form of light. HID lighting has several advantages over fluorescent or halogen lighting and is starting to be used more as a replacement for halogen lights as automobile headlights.
If you are thinking of converting to HID lighting, there are five things you need to know:
1) HID lighting has several advantages over halogen headlights
One advantage of HID lights is that HID lights are brighter and give better visibility to drivers than halogen lights. You as the driver will be able to see further and more clearly at night, also other drivers will be able to see better due to your lights.
HID light bulbs also last longer than halogen lights. Since HID lights do not have a filament in them that could burn out like halogen lights, HID light bulbs can last 2000-3000 hours vs 450-1000 hours for halogen light bulbs.
HID lighting requires less energy consumption than halogen lighting. HID lighting uses 35w vs 55w for halogen lighting. Most cars are set up with a 55w output, so if you are converting to HID lighting make sure to install the ballasts that come with your conversion kit so that the output will be reduced to 35w.
2) When converting to HID lighting or replacing HID light bulbs, you want to make sure to always get a matched pair of HID bulbs.
After about 100-500 hours of use, HID light bulbs undergo what is called a color shift. The light emitted by the bulb will shift slightly from a yellowish color to a more crisp blue color. You want a matched pair of HID bulbs so that this color shift occurs at the same time. When buying HID light bulbs, make sure that they have the same manufacturer, part number and use time (if previously used).
3) Understand the Kelvin temperature (k).
When talking about lighting, Kelvin is the old way of measuring color based on how hot something burns. HID conversion kits and bulbs come in different colors and brightness as described by the bulbâs Kelvin temperature. Some important things to note about Kelvin temperature is that it describes the color the light will be and the lower the Kelvin temperature, the brighter the bulb.
The Kelvin temperature scale for HID bulbs goes from 3000-12000k; 3000k being the brightest light and 12000k being the least bright. Typical lights and the colors each admits are 3000k (yellow), 4300k (white), 6000k (light blue), 8000k (deep blue), 10000k (bright violet) and 12000k (bright purple).
4) How to maintain and extend life of your HID bulbs. HID light bulbs last longer than other forms of lighting, but there are steps you can take to maintain their long life.
a. Use the right ballast and housing that is matched to your HID light.
b. Let your bulbs cool down between lightings. Turning an HID light off and on more than three times in an hour reduces the life of your bulb.
c. Set the HID light to burn in the correct position and plane which is horizontal +/-10% burn positioning.
d. Avoid touching the bulb with your skin. Oils and acids from the skin deposited on the glass can damage the bulb.
5) Use caution when handling HID lighting.
Do not handle HID bulbs excessively because oils from your skin can be transferred to the bulb and damage it. Also because HID light bulbs are filled with metallic vapors, in some cases mercury, caution should be used not to break them and when disposing of them. The voltage produced by the electrodes in the bulb is high and could give a shock if you are too close. The headlight assembly will protect you from this, but use caution when changing bulbs.
Friday, January 7, 2011
Dodge Quad Headlamp Install: How-To
How-To: Install BFxenon HIDs on Quad Headlight trucks
Step 2: Pull the grill back, lift up on the large tab and pull the grill back at the same time.
Step 3: Remove the 2x 10mm bolts that hold the housing in place
Step 4: In the fender well is a access panel to 1 more 10mm bolt and a long white plastic sliding clip that holds the headlight in. Pull the sliding clip down and remover the bolt.
Step 5: Once you have the headlight housing out, you will need to remove the cap and drill a 1" hold for the wires to come through.
Step 6: Remove the factory bulb and replace it with the BFxenon HID bulb. Use the 2 exposed leads to plug into the factory plug (for power to the ballast). Black to Black and Red to White and Blue
Step 7: Replace cap back into factory housing with the HID wires coming out the back. The wires coming out of the factory plug go into the Anti-Flicker kit and the Anti-Flicker kit goes into the ballast.
Step 8: Mount the ballast and AF Kit. *These are recommended mounting points... you may mount them according to your preference.
Step 9: Test lights before you re-install all the parts. This ensures all the wires are connected properly and you have mounted the ballasts away from any interferences
Step 10: Secure all the bolts back ion place and re-install the grill
Step 11: Take good pictures and send them to: Sales@BFxenon.com
I would like to thank the Stack Performance team for the truck and Tim to help with the install. Check out some of the beasts created at StackPerformance.com